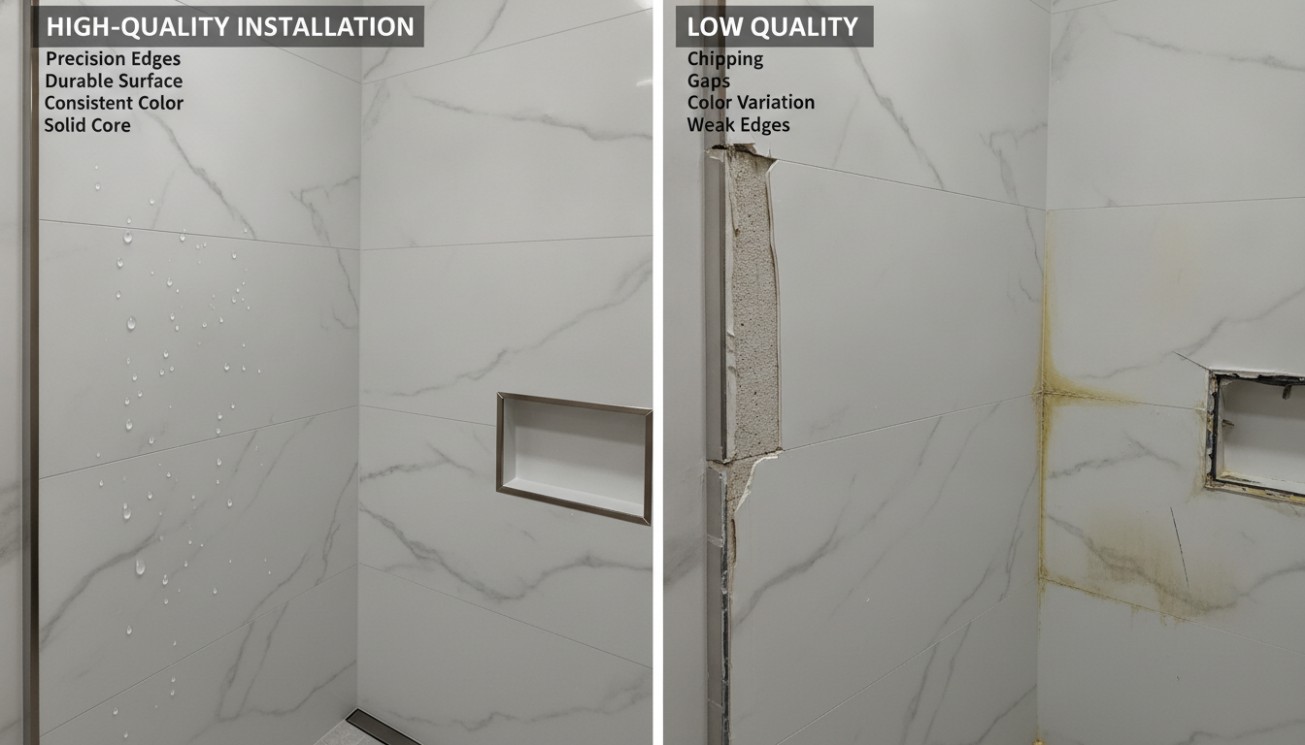
How to Install SPC Wall Panels: Tools, Trims, Adhesives and Sealing Details
SPC wall panel installation is not only about fixing panels to a wall
SPC wall panel installation is often described as simple, fast and cleaner than traditional tiling. In many projects, that can be true. Large panels can cover more wall area with fewer pieces. Some systems can reduce grout lines. Decorative surfaces can create a finished bathroom, kitchen or commercial wall without masonry work. But easy installation does not mean careless installation. A successful SPC wall depends on tools, substrate preparation, adhesive choice, trims, joint planning, waterproof sealing and realistic application boundaries.
This is why the better question is not only how to install SPC wall panels. The better question is how to install them as a complete wall system. The visible panel is only one part of the final result. Behind that clean surface, the installer must control wall flatness, moisture, bonding, edge protection, pipe penetrations, internal corners, external corners, bottom transitions and future maintenance. If those details are ignored, even a good panel can become a failed wall.
Many buyers first become interested in SPC because it appears easier than tile. That is especially true in bathroom renovation, shower walls, kitchen splashbacks, hotel bathrooms and apartment upgrades. However, SPC is not a magic surface that solves every wall problem. It must be installed over a stable substrate. It must be cut accurately. It must be sealed properly in wet zones. It must use suitable wall panel trims. It must be bonded with the right SPC wall panel adhesive. In some systems, it may also use interlocking edges, joining profiles or tongue and groove wall panels.
Previous articles on this site explained SPC wall panels as rigid waterproof wall systems, compared SPC wall panels vs tiles, and discussed when buyers can install SPC wall panels over tiles. This article focuses on the complete installation process itself. It is written for homeowners, contractors, importers, distributors and product teams who need to understand what actually makes an SPC wall work after the brochure photo is gone.
Start by defining the wall zone before choosing the installation method

The first step in SPC wall panel installation is not cutting a panel or opening a tube of adhesive. It is identifying the wall zone. A dry bedroom feature wall, a kitchen splashback, a bathroom vanity wall and a direct shower wall all require different levels of preparation and sealing. A method that works on a dry wall may not be acceptable inside a shower.
For example, a dry commercial feature wall may need visual alignment, panel flatness and clean trims. A bathroom vanity wall needs moisture resistance, easy cleaning and good edge treatment around mirrors and basins. A shower wall needs stricter waterproof wall panel sealing, pipe-hole sealing, internal corner protection and bottom-edge control. A wet room may need even more attention because water can spread beyond a single shower tray.
This zone-based thinking prevents one of the biggest mistakes in wall panel installation: treating every wall as the same wall. SPC panels can be used across many interior applications, but the installation details must match the environment.
Dry decorative walls
On dry interior walls, the main priorities are flatness, alignment, adhesive coverage, edge finishing and surface protection. These walls may appear in offices, retail stores, corridors, reception areas, bedrooms or living rooms. In these locations, the installer usually does not need the same wet-area sealing as a shower, but poor wall preparation can still create visible waves, loose edges or misaligned joints.
Bathroom and kitchen splash zones
For bathroom wall panel installation near basins, bathtubs or kitchen counters, splash resistance becomes important. The panel surface should be easy to clean, and edges near worktops, basins or fixtures should be sealed. These areas may not receive direct shower spray every day, but water exposure is still part of normal use.
Direct shower and wet room zones
SPC shower panel installation is the most demanding category. The wall will receive direct water, vapor, soap residue and repeated cleaning. In this zone, the installation is not only decorative. It becomes part of the moisture-control strategy. The installer must pay close attention to corners, joints, pipe penetrations, shower tray transitions, bottom edges and sealant compatibility.
Inspect the substrate before bringing panels to the wall

SPC panels are rigid. This is one of their advantages, but it also means they need a stable and reasonably flat substrate. A flexible material may hide some wall irregularities. A rigid panel can reveal them. Before installation, the wall must be inspected carefully.
Check whether the wall is dry
A wall with active moisture should not be covered. Moisture can weaken adhesive, damage hidden layers, create mold risk and cause future failure. This is especially important in bathrooms and old renovation projects. If there is a damp smell, staining, soft plaster, water marks or visible mold, the problem should be corrected before installation.
The article on SPC shower wall panels for wet rooms and bathrooms explains why waterproof panels must be treated as part of a complete wall system. A panel surface may resist water, but the substrate behind it still matters.
Check wall flatness
Use a straightedge or level to check whether the wall is flat enough for panel bonding. Large panels need continuous support. If the wall is badly uneven, adhesive contact may be inconsistent. This can create hollow areas, visible deflection, joint misalignment or edge lifting. Minor surface irregularities may be corrected with preparation, but severe wall problems should be repaired first.
Check wall strength
The wall should be strong enough to hold the panel system. Weak plaster, crumbling render, loose paint, powdery surfaces and unstable old tile are poor substrates. Adhesive bonds to the surface it touches. If that surface breaks away, the panel can fail even if the adhesive itself is strong.
Check existing coatings and contamination
Old paint, dust, oil, wax, soap film, silicone residue and cleaning chemicals can reduce adhesion. In bathrooms, old sealant and soap residue are common problems. In kitchens, grease may be present. In commercial interiors, walls may have paint layers or previous adhesives. The wall must be cleaned and prepared according to the panel and adhesive system.
SPC wall panel tools: what installers usually need

The correct SPC wall panel tools depend on panel thickness, core density, surface finish and installation method. However, most professional installations require measuring, cutting, bonding, leveling, trimming and sealing tools. A project should not begin until these tools are ready.
Measuring and layout tools
Accurate measurement is the foundation of how to install SPC wall panels properly. Installers usually need a tape measure, straightedge, pencil, level, laser level, square and possibly a template for pipe penetrations. Layout tools help prevent one of the most frustrating mistakes: discovering after cutting that the wall is not square or that a pipe opening is slightly misplaced.
For large-format panels, layout planning is especially important. The installer should decide where joints will fall, where trims will be used, how patterns will align and how narrow cuts will be avoided. In marble-look SPC, vein direction and visual flow should be considered before cutting.
Cutting tools
Cutting methods vary by panel type. Some SPC wall panels can be cut with a fine-tooth saw, circular saw, jigsaw, scoring tool or utility knife method depending on thickness and supplier instructions. Hole saws may be needed for pipes and shower controls. A sharp blade is important because rough cutting can damage edges, chip the surface or create poor trim fit.
Cutting should usually happen with the decorative face protected. The installer should support the panel during cutting so it does not flex, vibrate or crack. Dust control and eye protection are also important, especially when cutting dense composite panels.
Bonding and fixing tools
For adhesive installations, installers may need a caulking gun, notched trowel, adhesive spreader, temporary support blocks, spacers, roller or pressure tool. If mechanical fixing is part of the system, drills, screws, plugs, battens or clips may be required. The method should follow the supplier’s installation document.
Sealing and finishing tools
Wet-area installation requires sealant tools, smoothing tools, masking tape, cleaning cloths and compatible sealant. Trims may require cutting tools and careful positioning. A clean sealant line is not only functional; it also affects the final appearance of the bathroom.
Planning layout before adhesive is applied
Good SPC wall panel installation is planned before the first panel touches the wall. Layout planning affects appearance, waste, installation time and long-term performance.
Decide the starting point
The starting point depends on the wall shape, panel system and visible focal areas. In a shower, installers may start from a corner, a centerline or a main visible wall. In a vanity wall, the mirror and basin may define visual alignment. In a commercial feature wall, symmetry and lighting may matter more.
The goal is to avoid awkward cuts in visible areas. Narrow strips at corners, uneven pattern breaks and misaligned joints can make a wall look improvised. A few minutes of layout planning can prevent a wall from looking cheap.
Dry fit panels before bonding
Dry fitting is especially important for SPC shower panel installation. Panels should be placed against the wall without adhesive to confirm size, joint placement, pipe holes, trim clearance and overall appearance. Once adhesive is applied, correction becomes harder.
Plan pattern continuity
Many SPC panels imitate marble, stone or tile. These patterns can look premium when aligned well, but awkward when random. If panels are bookmatched, directional or designed for continuity, the installer should follow the pattern sequence. Even non-bookmatched panels should be arranged so the wall feels balanced.
Plan expansion and movement where required
Depending on product design, panel size and installation environment, the supplier may recommend small gaps at edges or transitions. These gaps may later be covered by trims or sealant. Installers should not assume that panels should be forced tightly into every corner unless the system specifically instructs this.
Choosing the right SPC wall panel adhesive
SPC wall panel adhesive is one of the most important installation choices. The adhesive must bond to the panel backing and the substrate. It must also suit the wall zone. A dry decorative wall, kitchen splash zone and shower wall may require different adhesive performance.
Adhesive must match both surfaces
An adhesive is only useful when it bonds well to both the wall and the panel. A strong adhesive on plaster may not perform the same way on glazed tile, cement board, painted wall, waterproof membrane or old substrate. This is why generic adhesive recommendations can be risky. Supplier guidance should be followed whenever available.
Wet-area adhesive must handle moisture conditions
For bathroom wall panel installation, adhesive must be suitable for humid environments. For direct shower walls, the adhesive system should be compatible with the panel, substrate and sealing method. If the adhesive weakens under moisture, heat vapor or cleaning conditions, the installation may fail.
Adhesive pattern affects support
Some systems use vertical beads. Some use a notched trowel. Some combine adhesive with double-sided tape for temporary holding. Some require mechanical fixing. The adhesive pattern affects air movement, curing and panel support. Installers should not randomly apply a few spots of adhesive unless the system specifically allows it. Spot bonding can create hollow zones behind large panels.
Temporary support may be required
Even a strong adhesive may need time to cure. Panels can slide, lift or move before curing if they are not supported. Temporary battens, spacers, tape or props may be needed depending on panel weight and adhesive type. This is especially important on vertical walls with large-format panels.
Understanding wall panel trims and edge systems
Wall panel trims are not minor accessories. They decide how professional the finished wall looks and how well edges are protected. In wet areas, trims also help manage water exposure at vulnerable transitions.
Internal corner trims
Internal corners are high-risk areas in showers and wet rooms. Two panels meet at a point where water can collect and movement may occur. Internal corner trims can create a cleaner transition and help the installer apply sealant in a more controlled way.
External corner trims
External corners are vulnerable to impact. They also reveal panel thickness. External corner trims protect the edge and make the wall look finished. In commercial interiors, exposed corners often receive more contact from people, carts, cleaning equipment or luggage. A clean trim system can reduce edge damage.
End caps
End caps finish exposed panel edges where the wall covering stops. This may happen near door frames, window returns, half-height installations, shower openings or feature wall boundaries. Without end caps, the raw edge may look unfinished and may be more vulnerable to damage.
Joining profiles and H trims
Large walls may require panel joints. Joining profiles help control those joints. In wet areas, joints must also be sealed according to system requirements. A visible profile can be part of the design if it is placed intentionally. A poorly placed joint can make the wall look patched.
Color and finish coordination
Trims should match the visual level of the panel. A premium marble-look panel paired with cheap mismatched plastic trims can reduce the perceived quality of the whole wall. Distributors should treat trims as part of the product line, not as an afterthought.
Tongue and groove wall panels: when interlocking edges help
Some systems use tongue and groove wall panels or other interlocking edges. These systems are designed to help panels align and connect more cleanly. They can be useful in bathrooms, utility rooms, decorative walls and commercial panels, but they still require correct wall preparation and sealing.
Interlocking edges can improve alignment
A tongue-and-groove edge can help panels sit together more consistently than simple butt joints. This can reduce visible gaps and make installation easier for long wall runs. It may also help create a more stable surface when panels are installed across a large area.
Interlocking edges do not replace sealing in wet areas
One dangerous misunderstanding is assuming that an interlocking joint is automatically waterproof. In a wet zone, the joint still needs to follow the supplier’s sealing requirements. Waterproof wall panel sealing depends on system instructions, not only on edge shape.
Panel direction matters
With tongue-and-groove systems, panel direction and starting point matter. Installers should understand how the profile locks, how the final panel will be inserted, and how corners will be finished. A wrong start can make the final edge difficult to close cleanly.
Waterproof wall panel sealing in bathrooms and showers
Waterproof wall panel sealing is the difference between a decorative bathroom wall and a reliable bathroom wall. The panel itself may be water-resistant, but water usually attacks transitions. Sealing must focus on the places where water can enter.
Seal internal corners carefully
Internal shower corners should be sealed according to the system method. This may involve trim profiles, compatible sealant, backing material or a combination of details. The seal should be continuous, clean and protected from direct damage where possible.
Seal pipe penetrations
Shower mixers, outlets, valves and pipes require holes through the panel. These holes must be cut accurately and sealed before cover plates are installed. A cover plate improves appearance but should not be the only moisture defense. If water enters behind a fitting, hidden damage can develop.
Seal bottom edges and tray transitions
The bottom edge near a shower tray, bathtub or wet room floor is one of the most critical details. Water can collect in this area. The edge must be finished so water cannot travel behind the panel. Installers should follow the recommended trim and sealant method.
Seal around niches and shelves
Niches, shelves and recesses create additional joints and horizontal surfaces. They can make a bathroom more useful, but they increase sealing complexity. If the project includes niches, layout and waterproof detailing should be planned before cutting panels.
Inspect sealant after curing
Sealant should not only be applied; it should be inspected. Gaps, bubbles, poor adhesion, contamination or interrupted lines can create weak points. In commercial projects, a final inspection checklist can reduce later complaints.
Bathroom wall panel installation step by step

The exact sequence for bathroom wall panel installation depends on the product system, but a professional process usually follows several common stages.
Step one: inspect and prepare the wall
Confirm that the wall is dry, flat, clean and stable. Remove old sealant, loose paint, dust, grease or failed materials. Repair weak areas before installation. If installing over tile, check that the tile is firmly bonded and prepared properly. The dedicated article on SPC panels over existing tiles explains that old tile must earn the shortcut before it becomes a reliable base.
Step two: measure and plan the layout
Measure the wall carefully. Mark panel positions, joint locations, pipe holes, trim positions and cut lines. Use a level or laser to maintain alignment. Plan the visible pattern before cutting.
Step three: cut panels and trims
Cut panels with suitable tools and protect the decorative surface. Cut trims accurately so corners and edges fit cleanly. Test all cut pieces before adhesive is applied. For shower valves and pipes, check hole positions carefully.
Step four: dry fit the wall
Place panels and trims in position without adhesive. Confirm that joints close correctly, trims fit, pipe holes align and the wall looks balanced. Dry fitting reduces costly mistakes.
Step five: apply adhesive or fixing system
Apply SPC wall panel adhesive according to the recommended pattern. Press the panel into position and ensure full contact. Use temporary support if required. Do not rush the next panel if the first panel is unstable.
Step six: install trims and manage joints
Install corner trims, joining profiles, end caps or other accessories according to the system. Make sure trims sit cleanly and do not force the panels out of alignment. Joint planning should combine appearance and function.
Step seven: seal wet-area details
Apply compatible sealant to internal corners, bottom edges, pipe penetrations and other high-risk locations. Smooth sealant properly and remove excess material before it cures. Clean the surface according to supplier instructions.
Step eight: inspect before use
Allow adhesive and sealant to cure as required. Inspect the wall before water exposure. Check joints, corners, edges and fixture openings. A good installer should not hand over a shower wall immediately after applying sealant if the system requires curing time.
DIY SPC wall panels: where they make sense and where they do not
DIY SPC wall panels are attractive because many homeowners want to reduce labor cost and complete renovation faster. SPC can be suitable for DIY in some situations, but not every bathroom should become a DIY project.
DIY may work for simple dry walls
A flat dry feature wall, laundry wall, pantry wall or low-risk decorative wall may be suitable for a careful DIY user. The work involves measuring, cutting, adhesive application and edge finishing, but moisture risk is lower. Good instructions and basic tools may be enough.
DIY may work for simple splash zones
Some backsplash or vanity wall projects may also be manageable for experienced DIY users if the wall is flat and the panel system is clear. However, edges near sinks still need sealing and the installer should understand the cleaning and maintenance requirements.
DIY is risky in direct shower zones
SPC shower panel installation involves higher risk because water exposure is direct and repeated. A small sealing mistake can lead to hidden moisture behind the wall. If the project includes pipe holes, internal corners, shower trays, niches or old wall damage, professional installation is safer.
Supplier documentation decides DIY confidence
If a product is marketed as DIY-friendly but has no installation guide, no adhesive recommendation, no trim details and no wet-area sealing instructions, the buyer should be cautious. A real DIY product should reduce uncertainty, not transfer all technical decisions to the user.
Common installation mistakes that create failed SPC walls
Mistake one: installing over a damp or weak wall
Covering moisture damage does not fix it. A weak substrate can cause adhesive failure and hidden damage. The wall must be repaired before panel installation.
Mistake two: skipping wall flatness checks
Rigid panels need support. If the wall is uneven, panels may not bond properly or may show waves. Flatness checks are essential for large-format SPC.
Mistake three: using the wrong adhesive
Not every adhesive is suitable for SPC, old tile, cement board, painted walls or wet areas. The wrong SPC wall panel adhesive can lead to lifting, slipping or long-term bond failure.
Mistake four: relying on sealant instead of trims
Sealant is important, but it should not be used to hide every bad cut or unfinished edge. Wall panel trims create cleaner and more reliable edges. A wall that depends on thick sealant lines often looks unprofessional.
Mistake five: leaving pipe penetrations poorly sealed
Pipe holes are small but high-risk. Decorative covers can hide gaps, but they do not automatically seal them. Penetrations must be treated carefully in wet zones.
Mistake six: ignoring curing time
Adhesive and sealant need time to cure. Using a shower too soon can weaken the installation. The supplier’s curing recommendations should be followed.
Mistake seven: treating every panel system the same
SPC panels vary by supplier. Thickness, edge design, backing, surface finish and installation method can differ. Installers should not assume that one system’s method applies to every product.
How distributors should support installation success
For distributors and importers, installation support is part of product quality. A panel line that looks good but creates installer confusion can damage the brand. A strong SPC product line should include more than panels.
Provide full installation documents
Documents should explain substrate requirements, suitable wall zones, cutting tools, adhesive method, trim use, sealing details, curing time, cleaning and maintenance. These documents help contractors install consistently and help customers understand what they are buying.
Offer complete accessory systems
Panels, trims, corners, end caps, joining profiles, sealant recommendations and adhesive guidance should be sold together whenever possible. A distributor who sells only panels may lose control over installation quality.
Create sample walls and training boards
Small swatches show color, but they do not show installation logic. A sample wall can demonstrate joints, trims, corners, pipe holes and finished edges. This is especially useful for builders, bathroom retailers and contractor training.
Separate DIY products from professional systems
Some panels may be simple enough for DIY dry-wall use. Others may be intended for professional wet-area installation. Distributors should label application levels clearly. This reduces misuse and after-sales disputes.
Installation quality is part of buyer risk control
For B2B buyers, SPC wall panel installation affects more than one project. It affects product reputation, repeat orders, claims, warranty cost and channel confidence. A buyer who imports panels without installation support may face complaints that are not caused by the panel itself but by installation uncertainty.
This is also true in other wall panel categories. The article on WPC wall panel installation with adhesives, clips and battens explains why fixing method and substrate preparation shape final performance. SPC is different from WPC in material behavior and wet-area use, but the sourcing lesson is similar: wall panels succeed when the product, accessories and installation method are developed together.
Final perspective: a successful SPC wall is installed as a system
How to install SPC wall panels is not a single-step answer. It is a system decision. The installer must understand the wall zone, inspect the substrate, select the right tools, plan the layout, cut accurately, choose the right adhesive, use suitable trims, seal wet-area details and inspect the wall before handover.
SPC can be faster than tile in many renovation projects. It can create cleaner bathroom walls with fewer grout lines. It can support modern marble-look and stone-look interiors. It can help hotels, apartments, retail spaces and homeowners upgrade walls with less disruption. But none of those advantages remove the need for installation discipline.
For homeowners, the key lesson is to choose the right wall zone and avoid using DIY confidence in places where waterproof detailing is critical. For contractors, the lesson is to treat SPC as a wall system, not a decorative shortcut. For distributors, the lesson is to provide panels, trims, adhesives, documents and training together. For importers, the lesson is to evaluate installation support as part of supplier quality.
The strongest SPC installations are not the ones that look good only on the day of completion. They are the ones that remain stable, clean, sealed and maintainable after months and years of real use. That result comes from details: accurate measurement, proper SPC wall panel tools, compatible SPC wall panel adhesive, well-selected wall panel trims, controlled joints, careful waterproof wall panel sealing and honest understanding of where DIY SPC wall panels are appropriate.
In short, SPC wall panels are easy to install only when the installer respects the system. When the wall, panel, adhesive, trims and sealant work together, SPC becomes a practical modern wall solution. When any of those parts is ignored, the wall becomes a risk hidden behind a decorative surface.
Focused FAQ
What tools are needed for SPC wall panel installation?
Common SPC wall panel tools include a tape measure, level, straightedge, pencil, square, cutting saw or scoring tool, hole saw, caulking gun, adhesive tools, spacers, trim cutters, sealant tools and safety equipment. The exact tools depend on panel thickness and supplier instructions.
How do you install SPC wall panels?
How to install SPC wall panels depends on the system, but the basic process includes wall inspection, layout planning, measuring, cutting, dry fitting, applying adhesive or fixings, installing trims, sealing edges and inspecting the wall before use.
What adhesive should be used for SPC wall panels?
SPC wall panel adhesive should be compatible with both the panel backing and the wall substrate. In bathrooms or showers, it should also be suitable for humid or wet-area conditions. Supplier recommendations should be followed.
Do SPC wall panels need trims?
Yes, wall panel trims are strongly recommended for exposed edges, internal corners, external corners, joining profiles and end caps. Trims improve appearance, protect edges and help manage wet-area details.
Are tongue and groove SPC wall panels waterproof?
Tongue and groove wall panels can improve alignment and joint appearance, but the joint is not automatically waterproof. In shower or wet areas, sealing must follow the supplier’s wet-area installation instructions.
Can SPC wall panels be installed in a shower?
Yes, SPC shower panel installation is possible when the panel system is designed for wet areas and the installer properly seals corners, joints, pipe penetrations and bottom edges.
Can SPC wall panels be installed by DIY users?
DIY SPC wall panels may be suitable for simple dry walls or low-risk splash zones. Direct shower walls, wet rooms, old damaged walls and complex pipe penetrations are usually better handled by experienced installers.
How should waterproof wall panel sealing be done?
Waterproof wall panel sealing should focus on internal corners, external corners, bottom edges, shower tray transitions, pipe penetrations, niches and joints. Compatible sealant and correct trims should be used according to the system instructions.
Can SPC panels be installed over old tiles?
SPC panels can be installed over old tiles when the tiles are dry, flat, firmly bonded and properly prepared. If tiles are loose, damp, moldy or uneven, they should be repaired or removed before installation.
What is the most common reason SPC wall panel installation fails?
The most common failures come from poor substrate preparation, wrong adhesive, weak sealing, missing trims, uneven walls, rushed curing time or using the wrong installation method for the wall zone.
#SPCWallPanelInstallation #HowToInstallSPCWallPanels #SPCShowerPanelInstallation #WallPanelTrims #SPCWallPanelAdhesive #TongueAndGrooveWallPanels #BathroomWallPanelInstallation #WaterproofWallPanelSealing #SPCWallPanelTools #DIYSPCWallPanels #BathroomRenovation #WallPanelSystems #FocusedFAQ