Can SPC Wall Panels Be Installed Over Existing Tiles? A Practical Guide for Safer Bathroom Renovation
Installing SPC over old tiles sounds simple, but the wall must earn that shortcut
One of the most attractive promises in bathroom renovation is the idea that a new wall finish can be installed without removing the old tile. For homeowners, this means less dust, less noise, less demolition waste and a shorter renovation period. For contractors, it can mean faster project turnover. For landlords, hotel operators and apartment managers, it can reduce downtime. For distributors, it creates a strong selling point for renovation wall panels. This is why many buyers ask whether they can install SPC wall panels over tiles.
The honest answer is yes, SPC panels over existing tiles can work in many renovation projects, but only when the existing tiled wall is stable, dry, flat, clean and suitable for bonding or mechanical fixing. The shortcut is not created by the new panel alone. It is created by the condition of the old wall, the preparation method, the adhesive system, the trim design, the sealing details and the installer’s discipline.
This is where many bathroom renovation mistakes begin. Some buyers hear that bathroom wall panels over tiles are possible and assume that any old tiled wall can be covered immediately. That is dangerous. A new SPC surface can hide problems, but it cannot repair active leakage, loose tiles, mold, hollow substrate, structural movement or trapped moisture. If the original wall is failing, covering it with SPC may only make the failure harder to see until it becomes more expensive.
Earlier articles on this site explained SPC wall panels as rigid waterproof wall systems, compared SPC wall panels vs tiles for bathroom renovation, and discussed SPC shower wall panels for wet rooms and bathrooms. This article focuses on a more practical question: when old tiles can become a reliable base for SPC, and when demolition is still the safer decision.
Why buyers want to install SPC wall panels over tiles

The demand for tile cover wall panels is not difficult to understand. Old bathrooms often have tiles that look outdated but are still firmly attached. The homeowner may dislike the color, grout condition or dated layout, but the wall itself may not be structurally damaged. In these situations, removing all tiles can feel excessive. Demolition creates dust, noise, disposal costs, hidden repair work and longer project timelines.
For commercial operators, the cost of renovation is not only material and labor. A hotel bathroom that is closed for several days means lost room revenue. A rental apartment under renovation cannot be leased. A student housing unit cannot be turned over quickly. A clinic or small commercial restroom may disrupt daily operation if construction takes too long. In these contexts, bathroom wall panels over tiles become attractive because they can reduce the renovation window when the existing wall is suitable.
SPC is especially relevant because it can create a rigid, stone-look or marble-look wall surface with fewer grout lines than traditional tile. Compared with painting over old tile, SPC can deliver a more complete visual transformation. Compared with retiling, it can reduce some layout and grout work. Compared with very thin flexible panels, SPC may feel more solid and more suitable for modern bathroom surfaces when installed correctly.
Time saving is the first reason
Removing old tiles is unpredictable. A wall that looks simple may reveal damaged plaster, old adhesive layers, uneven backing, moisture staining or outdated waterproofing. Every hidden problem can extend the job. If the existing tiles are flat, dry and firmly bonded, installing SPC panels over existing tiles can reduce demolition and shorten the workflow.
This does not mean installation is instant. The wall still needs inspection, cleaning, possible sanding, leveling checks, adhesive planning, edge finishing and sealing. But compared with full tile removal and retiling, the process can be more efficient in suitable conditions.
Less dust and less disturbance matter in occupied spaces
Dust control is a major concern in occupied homes, hotels, rental units and healthcare-related spaces. Tile removal can create debris and fine dust, especially in older bathrooms. Noise can also disturb nearby rooms. A panel-over-tile method can reduce disruption because the old surface remains in place.
This is one reason old bathroom tile renovation has become a strong topic in wall panel content. Many buyers do not want a complete construction project. They want a cleaner upgrade path. SPC can support that goal when the wall condition allows it.
Grout problems can be visually and practically reduced
Old grout lines are a common reason people want renovation. Grout may become stained, cracked, uneven, moldy or visually dated. By covering the old tile field with large SPC panels, the finished wall can have fewer visible joints and a cleaner appearance. This is especially attractive for shower panels over tiles, where grout maintenance is one of the most common user frustrations.
However, this does not mean grout-related moisture problems disappear automatically. If the old grout failure is only cosmetic, SPC may be a practical cover. If grout failure is caused by active water penetration, movement or hidden substrate damage, the old problem must be repaired before covering.
The first decision: is the old tiled wall healthy enough?

Before thinking about adhesive or panel pattern, the installer should inspect the existing tiled wall. This inspection decides whether install SPC wall panels over tiles is reasonable or risky. A healthy tiled wall can become a stable substrate. A weak tiled wall becomes a hidden failure layer.
Check whether tiles are firmly bonded
The most basic test is adhesion. Tiles should not be loose, hollow, cracked, lifting or moving. A contractor can tap the wall to listen for hollow sounds. Hollow areas may indicate weak bonding behind the tile. If a large area sounds hollow, the wall should not be covered directly. Loose tiles can move after SPC installation and weaken the bond between layers.
If only a few tiles are loose, they may be removed and repaired before panel installation. If many tiles are loose, full removal may be safer. Covering a weak tile layer with SPC creates a sandwich of unstable materials. The new wall may look good at first, but movement behind the panel can lead to adhesive failure, edge gaps or visible surface problems.
Check for active leakage and dampness
Moisture inspection is essential. Look for dark stains, mold smell, swelling, peeling paint nearby, damp plaster, soft areas, failed silicone, cracked corners or water marks around pipe penetrations. If the wall has active leakage, waterproof wall cladding over tiles is not a solution. The leak must be found and repaired first.
This point is especially important in shower areas. A tiled shower wall may appear acceptable on the surface while water has already entered behind the tile. If SPC is installed over that wall, moisture can become trapped. The new surface may delay visible warning signs while the hidden wall continues to deteriorate.
Check wall flatness
SPC panels are rigid. That rigidity helps create a clean and solid wall appearance, but it also means the substrate should be flat. A wall with severe tile lippage, uneven repairs, bowed areas or proud corners may prevent the SPC panel from bonding evenly. Uneven walls can also make joints and trims look poor.
Installers should use a straightedge or level to check flatness. Minor unevenness may be corrected with suitable preparation or adhesive strategy, depending on the system. Severe unevenness usually requires repair before installation. A large rigid panel will not magically make an uneven wall flat.
Check surface cleanliness and glaze condition
Old tiles may be covered with soap residue, oils, silicone, wax, cleaning chemicals, scale or dust. Adhesive cannot bond reliably to contaminated surfaces. Glossy glazed tile can also reduce adhesion if not prepared correctly. Cleaning and surface abrasion may be necessary before SPC wall panel installation.
This is one reason contractors should not promise same-day installation without seeing the wall. Surface preparation can be the difference between a stable panel and a future callback.
When SPC can usually be installed over existing tiles
There are several conditions where installing SPC panels over existing tiles is usually reasonable. The word “usually” matters because product instructions and local building practices should still be followed.
The tiles are sound, flat and dry
The best case is an old tiled wall that is outdated but structurally sound. The tiles are firmly bonded, the wall is flat, the grout is not actively failing, there is no mold smell, and there is no sign of water leakage. In this situation, SPC may be used as a surface upgrade after proper cleaning and preparation.
This is common in older bathrooms where the tile color or format is outdated, but the wall is still stable. For these projects, old bathroom tile renovation with SPC can reduce dust and speed up visual transformation.
The project is a cosmetic renovation, not a repair of water damage
If the goal is to modernize the wall appearance, reduce visible grout lines and improve cleaning convenience, SPC can be a strong option. If the goal is to hide water damage, SPC is the wrong starting point. A cosmetic material should not be used to cover a building defect.
This distinction helps contractors explain the project honestly. Bathroom wall panels over tiles are best for renovation, not concealment. They improve a healthy wall. They do not cure an unhealthy wall.
The tile surface can be properly prepared for bonding
A successful installation depends on bond quality. Some old tiles may require sanding, deglazing or mechanical keying to help adhesive grip. The surface should be cleaned thoroughly and allowed to dry. Silicone residues should be removed because many adhesives do not bond well to silicone-contaminated surfaces.
Installers should follow the panel supplier’s adhesive recommendations. A random construction adhesive may not be suitable for every SPC backing or tile surface. If the supplier provides a tested adhesive system, that guidance should be respected.
The wall layout allows practical panel placement
Large panels need layout planning. If the tiled wall has many small returns, niches, shelves, pipe holes, uneven ceiling lines or awkward corners, the installation may still be possible but more complex. A simple flat shower wall or vanity wall is easier. A highly interrupted wall requires more cutting and more sealing points.
Before approving DIY bathroom wall panels, buyers should understand this. A straightforward wall may be suitable for advanced DIY users. A complex wet room with multiple penetrations should usually be handled by experienced installers.
When old tiles should be removed first

There are also clear situations where installing SPC over existing tiles is not advisable. These conditions create too much hidden risk.
Large areas of loose or hollow tile
If the tiled wall has large hollow areas or loose tiles, the old tile layer is not a reliable substrate. Installing SPC over it may transfer the weakness into the new wall. The panel may bond to the tile, but the tile may not remain bonded to the wall. That creates a hidden failure path.
Active water leakage or mold behind the wall
If there is active leakage, mold smell, dampness, soft substrate or repeated staining, the wall should be opened and repaired. Waterproof wall cladding over tiles should not be used to hide a moisture problem. In wet areas, trapped moisture can cause long-term damage and indoor air quality concerns.
Severe wall unevenness
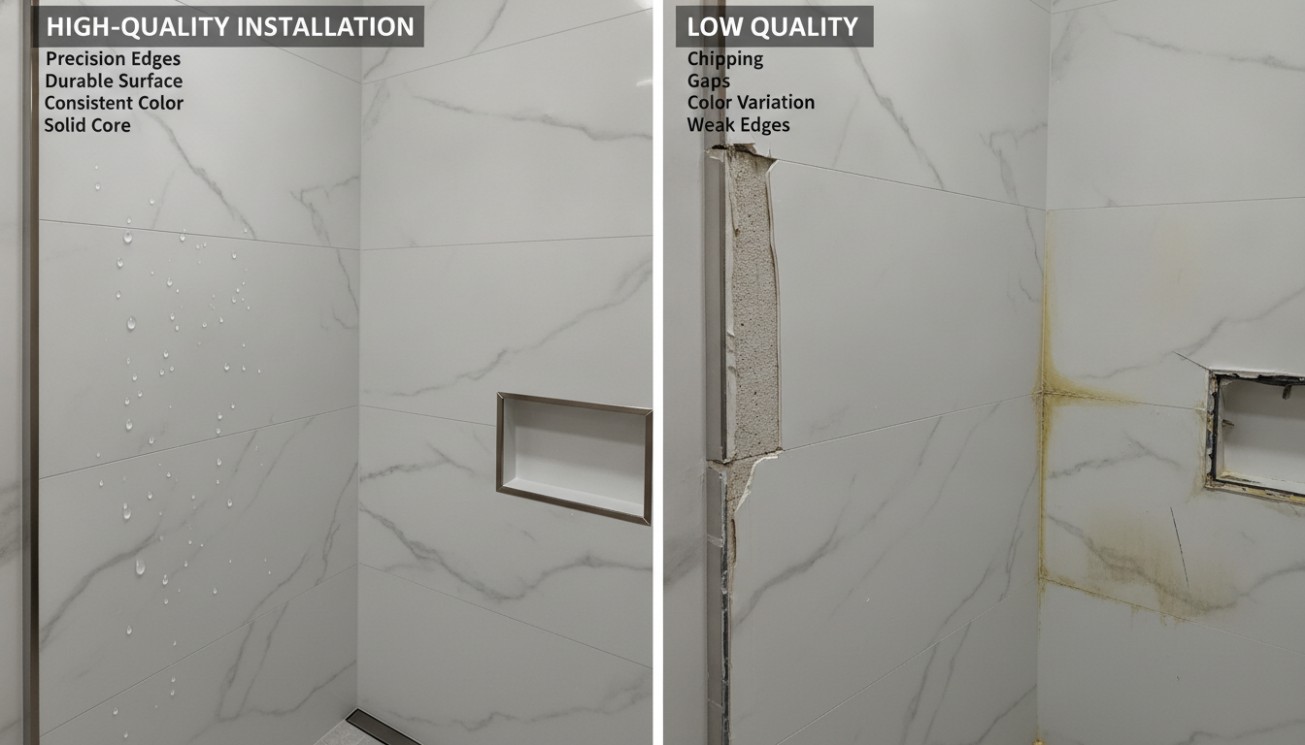
If the tiled wall is badly uneven, bowed or damaged, direct panel installation may create poor contact and weak bonding. The finished wall may show waves, gaps or edge problems. Removing the tile and repairing the substrate may be the better long-term approach.
Old tile layout creates impossible edge details
Some bathrooms have thick tile edges, deep corners, old trims, uneven shower trays, window reveals or built-in shelves that make new panel finishing difficult. If the edges cannot be sealed and finished professionally, removing old materials may be safer.
The building requires inspection or code compliance updates
In some projects, especially commercial bathrooms, accessibility upgrades, insurance repairs or regulated wet areas, the wall may need inspection, waterproofing verification or code-related upgrades. Covering old tiles may not be acceptable without checking local requirements. Contractors and project owners should confirm this before installation.
How to prepare old tiles before SPC installation
Preparation is where many successful and unsuccessful projects separate. The old tile surface must be turned into a reliable base for SPC wall panel installation.
Remove loose fittings and old sealant
Before installation, remove accessories that interfere with the new panel surface. This may include old towel bars, soap holders, damaged trims, failed silicone, loose shelves and unnecessary fixtures. Old silicone should be removed carefully because silicone residue can interfere with adhesive bonding and new sealant performance.
If fixtures will be reinstalled, plan their backing and fixing method. Heavy items should not depend only on the SPC panel. They need proper support in the wall behind the panel.
Deep clean the tile surface
Old bathroom tiles may contain years of soap film, mineral scale, grease, cleaning residue and dust. The surface should be cleaned with a method suitable for the tile and adhesive system. After cleaning, the wall must dry fully. Installing panels over damp or contaminated surfaces can reduce adhesion.
For shower walls, pay special attention to corners, bottom edges and areas near plumbing fixtures. These areas often hold residue and moisture.
Sand or deglaze glossy tiles when required
Many old tiles are glazed and smooth. Adhesive may not bond strongly to a very glossy surface unless it is prepared. Light sanding or deglazing can create a better mechanical key. The exact method should follow adhesive and supplier recommendations. Dust must be removed after sanding.
This step is often ignored in quick installations. It should not be. A wall panel may fail not because SPC is weak, but because the adhesive never bonded correctly to the old tile glaze.
Repair small gaps and uneven areas
Missing tiles, deep grout gaps, chips or uneven transitions may need filling or leveling before panel installation. The goal is to create continuous support behind the SPC panel. Large voids can reduce bonding area and create weak points.
Installers should not rely on thick adhesive blobs to solve every wall problem. Adhesive should be part of the installation system, not a substitute for substrate repair.
Dry fit panels before bonding
Before adhesive is applied, panels should be measured and dry fitted. This helps confirm cuts, joint placement, trim locations and pipe openings. Dry fitting is especially important for shower panels over tiles, where mistakes around valves and corners can be difficult to correct after bonding.
Adhesive, trims and sealing decide whether the finished wall works
A successful tile-over-SPC project is not only about the panel. Adhesive, trims and sealant are equally important. The finished wall must behave as a system.
Choose adhesive for both SPC and tile
The adhesive must bond to the SPC panel backing and to the prepared tile surface. It must also be suitable for bathroom or wet-area use when installed in showers or splash zones. Some adhesives may require temporary support while curing. Some may require a specific bead pattern. Some may not perform well on glossy ceramic surfaces without preparation.
Suppliers should provide adhesive recommendations. If they cannot, the buyer should be cautious. SPC wall panel installation in wet areas needs more than generic advice.
Use trims to control edges and transitions
Trims help finish exposed edges, internal corners, external corners and joints. They also protect panel edges and create a cleaner appearance. Without trims, installers may rely too heavily on sealant or improvised finishing, which can reduce the professional look of the wall.
For tile cover wall panels, trims are especially useful because the new panel may sit proud of the old wall surface. Edge profiles can help manage thickness changes at door frames, windows, shower trays, ceilings and adjoining walls.
Seal high-risk areas carefully
The highest-risk areas are internal corners, bottom edges, pipe penetrations, shower valve openings, shelf fixings and wall-to-tray transitions. These areas should be sealed according to the product system. A waterproof panel can still fail if water enters at a poorly sealed opening.
This is especially important when installing waterproof wall cladding over tiles. The old tiled wall may already have vulnerable points. The new surface should not add more.
Plan for movement and service access
Buildings move slightly. Materials expand and contract. Fixtures may need future access. A good installation should not trap components in a way that makes future maintenance impossible. For shower valves and plumbing areas, installers should consider how service access will be handled if needed.
SPC over tiles in shower areas needs extra caution
Installing SPC over tiles in a dry vanity area is lower risk than installing it inside a shower. Shower panels over tiles face direct water exposure, cleaning, heat vapor and repeated wet-dry cycles. The installation must be more disciplined.
Do not cover a failing shower
If the old shower tile has failed, SPC should not be used as a cover-up. Signs of failure include soft walls, persistent mold smell, cracked corners, loose tiles, water stains on adjacent rooms, swelling skirting, damaged ceilings below or repeated silicone failure. These problems should be investigated before any new panel is installed.
Bottom edges matter
The bottom edge near the shower tray, bath edge or wet room floor is one of the most important details. Water can collect here. If the edge is poorly sealed, water can travel behind the panel. The transition should be finished with the correct trim, sealant and slope logic where applicable.
Pipe penetrations must be sealed, not just covered
Shower valves, outlets and mixer controls require holes in the panel. These openings should be cut accurately and sealed carefully. Decorative cover plates may hide the hole, but they should not be the only defense against water. The sealing method should follow the system guidance.
Niches and shelves increase complexity
Shower niches, shelves and recesses create extra corners and horizontal surfaces. They can look beautiful, but they increase sealing complexity. For DIY users, a simple flat panel installation is much easier than a shower niche project. Contractors should plan these details before ordering panels.
DIY installation: possible, but not for every bathroom

Many products are promoted as DIY bathroom wall panels. This can be true for simple walls and experienced users, but it should not be treated as a universal promise. A person who can install a panel on a dry laundry wall may not be prepared to waterproof a shower corner.
DIY may be suitable for simple dry or splash zones
A flat vanity wall, laundry splashback or decorative bathroom wall may be reasonable for a careful DIY user. The project should involve simple cuts, limited penetrations and clear instructions. The old tiles should be stable, clean and dry.
DIY is riskier inside showers
Direct shower walls involve higher consequences. A small mistake in sealing can lead to hidden moisture damage. If the project includes internal corners, plumbing penetrations, uneven old tiles or shower tray transitions, a professional installer is often the better choice.
Good instructions are part of product quality
If a supplier markets panels for DIY use but provides poor instructions, unclear adhesive guidance and no trim details, the buyer should be cautious. Clear installation documents are not optional. They are part of product quality.
The same principle appears in other wall panel categories. The guide on wall panel installation with adhesives, clips, battens and trims explains why fixing method and substrate preparation shape the final result. SPC installation over tiles follows the same system logic, but wet-area sealing makes the risk higher.
How contractors should explain tile-over-SPC renovation to clients
Contractors should explain bathroom wall panels over tiles as a conditional solution, not a guaranteed shortcut. This builds trust and reduces disputes.
Start with inspection, not product choice
The first conversation should be about the wall condition. Are the tiles loose? Is there dampness? Are there cracks? Is the wall flat? Has the bathroom had leaks before? Is the shower tray stable? These questions decide whether SPC over tile is responsible.
Separate visual renovation from waterproof repair
Clients may confuse a waterproof-looking panel with a waterproof repair. Contractors should explain that waterproof wall cladding over tiles can improve the finished wall surface, but it does not repair hidden leaks or failed substrates. If repair is needed, it must happen first.
Use samples to explain thickness and edge details
SPC panels add thickness to the wall. This may affect corners, trims, doors, windows, shower glass and fixture positions. Contractors should show clients how edges will be finished. A sample panel with trim is more useful than a small color swatch.
Explain maintenance after installation
SPC can reduce grout-line cleaning, but sealant lines still need inspection and the surface still needs regular cleaning. Clients should understand how to clean the panels, what chemicals to avoid and when sealant should be checked.
How distributors should position SPC panels for tile-over renovation
For importers and distributors, SPC panels over existing tiles can be a strong selling angle, but it must be supported properly. If the marketing is too simple, installers and customers may misuse the product.
Build a clear “over tile” installation package
A serious product line should include panels, compatible adhesive, trims, internal corner profiles, external corner profiles, end caps, sealant recommendations, surface preparation instructions and a tile-over checklist. This gives contractors confidence and reduces after-sales problems.
Create application boundaries
Distributors should clearly state when tile-over installation is not recommended: loose tiles, active leaks, mold, severe unevenness, unstable walls, poor ventilation or code-sensitive areas without inspection. Honest boundaries make the product more credible.
Offer sample boards and installed displays
Customers need to see how the panel looks over a wall, how trims finish edges and how the final surface differs from tile. A showroom display can explain the value of tile cover wall panels better than a catalog image.
Train installers before scaling sales
SPC over tile is simple only when the wall is simple. Installers should be trained on inspection, cleaning, sanding, adhesive pattern, dry fitting, pipe holes, trim use and wet-area sealing. If distributors ignore installer training, product complaints may increase even when the panel itself is good.
Cost logic: why avoiding demolition is not the same as avoiding preparation
One reason buyers want to install SPC wall panels over tiles is cost control. Avoiding demolition can reduce labor, waste and time. But it does not eliminate preparation cost. A responsible project still includes inspection, cleaning, repairs, adhesive, trims, sealant and careful installation.
Demolition cost may be reduced
If the old wall is healthy, leaving tiles in place can reduce disposal, dust control and repair work. This is especially valuable in occupied buildings and multi-room renovation projects.
Preparation cost remains necessary
Cleaning, sanding, leveling, removing old silicone and repairing damaged areas take time. These steps protect the new installation. Skipping them may save money at the beginning but increase failure risk later.
Accessories affect real project cost
Trims, sealants, adhesives, cutting tools and spare panels should be included in the budget. A panel-only price is not a complete wall price. This is the same logic discussed in the broader SPC, PVC and WPC wall panel material guide: a wall material should be judged by the system cost, not only by square meter price.
Common mistakes when installing SPC panels over tiles
Mistake one: assuming all old tiles are suitable
Old tile is only a good substrate if it is firmly bonded, dry and flat. If it is loose, damp or uneven, it becomes a risk layer.
Mistake two: ignoring glossy surface preparation
Adhesive may not bond well to smooth glazed tile without proper cleaning and surface preparation. Sanding or deglazing may be necessary depending on the system.
Mistake three: leaving old silicone in place
Old silicone residue can interfere with new adhesive and sealant. It should be removed carefully before installation.
Mistake four: using panels to hide leaks
SPC should not be used to conceal water damage. Hidden leakage must be repaired before installing renovation wall panels.
Mistake five: treating shower installation like a dry wall project
Shower areas require stricter sealing, trim use and substrate checks. A method that works on a dry wall may not be enough for direct water exposure.
Mistake six: forgetting future fixtures
Cabinets, shelves, grab bars and shower accessories need proper fixing. The panel is a finish layer, not a structural support.
A practical inspection checklist before approving SPC over tiles
Before approving SPC wall panel installation over old tiles, contractors and buyers can use a simple checklist.
Wall condition checklist
- Tiles are firmly bonded with no large hollow areas.
- No active leakage or damp smell is present.
- No visible mold, swelling or soft substrate is detected.
- The wall is flat enough for large rigid panels.
- Old silicone and loose accessories can be removed.
- The tile surface can be cleaned and prepared for bonding.
Installation checklist
- Panel layout is planned before cutting.
- Adhesive is suitable for both SPC and prepared tile.
- Trims are available for exposed edges and corners.
- Pipe penetrations will be sealed correctly.
- Bottom edges and shower tray transitions are planned.
- Cleaning and maintenance instructions will be provided after installation.
Project boundary checklist
- The installation is cosmetic renovation, not hidden leak repair.
- The wall zone is appropriate for the selected product.
- Heavy fixtures have proper structural backing.
- Local requirements and building rules are considered where necessary.
- The supplier provides technical guidance, not only product photos.
Final perspective: SPC over tiles is a smart renovation method only when the old wall is reliable
Install SPC wall panels over tiles is one of the most practical ideas in modern bathroom renovation, but it should be treated as a conditional method, not a universal rule. When the old tiled wall is stable, dry, clean and flat, SPC can provide a faster and cleaner way to create a modern bathroom surface. It can reduce demolition, cover outdated tile patterns, reduce visible grout lines and support a more efficient renovation process.
But when the old wall is loose, damp, moldy, uneven or leaking, direct installation becomes a risk. SPC cannot rescue a failing substrate. It cannot make hidden water damage disappear. It cannot replace proper sealing, wall repair or waterproofing discipline. In these cases, old tiles should be removed and the wall should be repaired before any new panel system is installed.
The most professional approach is to view bathroom wall panels over tiles as a wall assembly decision. The old tile layer, adhesive, SPC panel, trims, sealant, pipe openings, bottom edges and maintenance plan all work together. If one part is ignored, the finished wall may fail even if the panel looks beautiful on day one.
For homeowners, the lesson is to ask for inspection before choosing the fastest option. For contractors, the lesson is to explain both the benefits and the limits of tile-over installation. For distributors, the lesson is to sell a complete system, not only loose panels. For commercial buyers, the lesson is to standardize the method before rolling it out across many rooms.
Used correctly, SPC panels over existing tiles can be one of the most useful solutions for old bathroom tile renovation. Used carelessly, they can become a decorative cover over hidden failure. The difference is not whether SPC is a good material. The difference is whether the existing wall is good enough to become part of the new system.
Focused FAQ
Can SPC wall panels be installed over existing tiles?
Yes. SPC panels over existing tiles can work when the old tiles are firmly bonded, dry, clean, flat and free from active leakage or mold. The surface must be prepared correctly before installation.
When should old tiles be removed before installing SPC panels?
Old tiles should be removed if they are loose, hollow, cracked, damp, moldy, severely uneven or affected by active water leakage. Tile cover wall panels should not be used to hide wall failure.
Can SPC panels be used over tiles inside a shower?
Shower panels over tiles can be used when the existing shower wall is healthy and the SPC system is suitable for wet areas. Corners, bottom edges, pipe holes and joints must be sealed carefully.
Do old tiles need sanding before SPC installation?
Glossy tiles may need sanding, deglazing or surface abrasion depending on the adhesive and supplier instructions. Proper surface preparation helps adhesive bond to the old tile surface.
What adhesive should be used for SPC panels over tiles?
The adhesive should be compatible with both the SPC panel backing and the prepared tile surface. It should also be suitable for bathroom or wet-area use when installing waterproof wall cladding over tiles.
Can SPC panels hide old grout lines?
Yes. Large SPC panels can cover old grout lines and create a cleaner surface. However, if grout damage is caused by active moisture problems, the wall should be repaired before covering.
Are SPC wall panels over tiles suitable for DIY installation?
DIY bathroom wall panels may be suitable for simple dry or splash-zone walls, but shower walls and complex wet areas require more careful sealing and are often better handled by experienced installers.
Do SPC panels over tiles need trims?
Trims are strongly recommended for exposed edges, internal corners, external corners and transitions. They improve appearance and help protect edges in bathroom wall panel installations.
Will installing SPC over tiles make the wall waterproof?
No wall becomes waterproof just because a panel is added. The final result depends on substrate condition, adhesive, trims, sealants, pipe penetrations, bottom edges and correct installation.
What is the biggest risk of installing SPC over existing tiles?
The biggest risk is covering a wall that already has hidden moisture damage, loose tiles or active leakage. A new SPC surface can hide the problem temporarily, but the failure may continue behind the panel.
#SPCWallPanels #SPCPanelsOverTiles #BathroomWallPanelsOverTiles #ShowerPanelsOverTiles #TileCoverWallPanels #BathroomRenovation #OldBathroomTileRenovation #SPCWallPanelInstallation #WaterproofWallCladding #DIYBathroomWallPanels #WallPanelInstallation #RenovationMaterials #FocusedFAQ