How to Install PU Stone Wall Panels Without Turning a Simple Upgrade Into a Failed Wall
Installation is where the promise of lightweight panels becomes real
The market often describes PU wall panels as lightweight, easy to handle, fast to install, and more convenient than traditional stone veneer. Those claims are partly true. Compared with natural stone or cement-based veneer, faux stone wall panels made from polyurethane are usually easier to lift, easier to cut, easier to transport, and easier to apply on many interior feature walls.
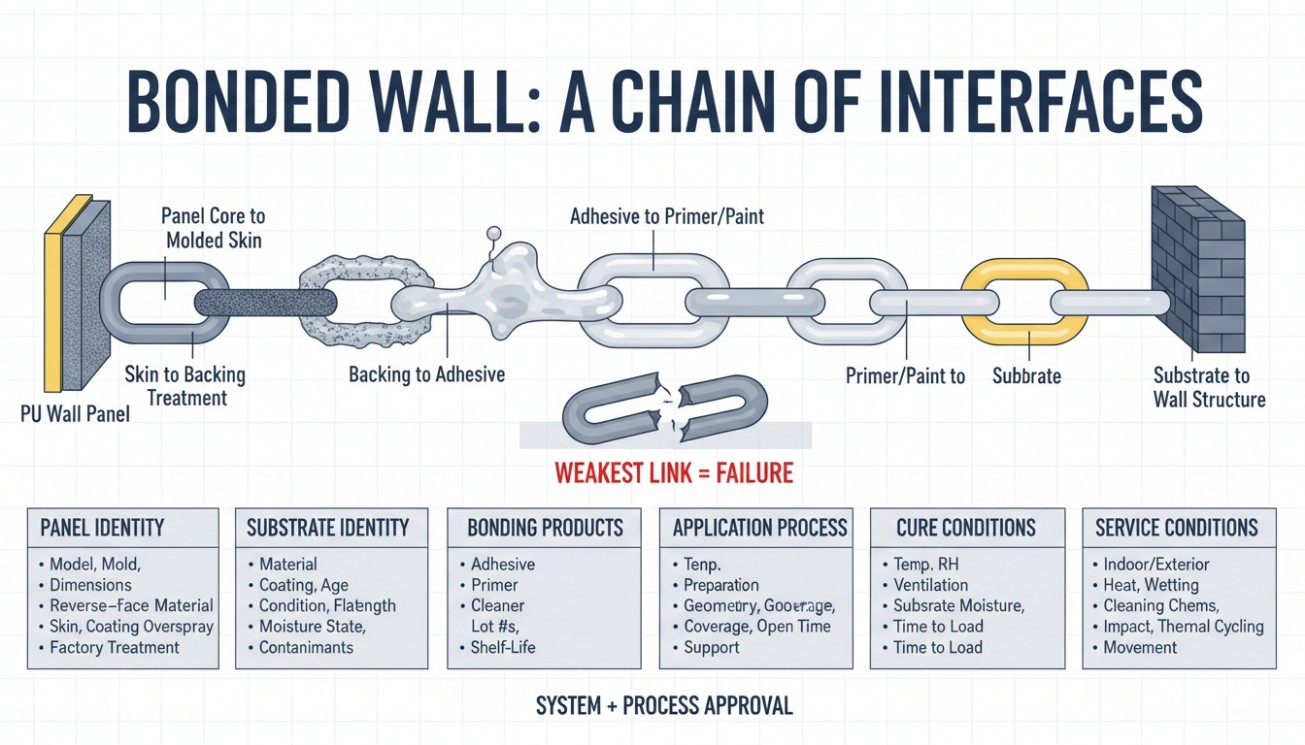
But this is where many projects go wrong. Easier installation does not mean no installation discipline. A wall panel still has to sit on a real wall, meet real corners, deal with real outlets, align with real ceilings and floors, and survive real use after the installer leaves. If the substrate is weak, the layout is not planned, the adhesive is wrong, the seams are careless, or the corners are unfinished, even a good-looking panel can become a poor wall.
That is why PU stone panel installation should be treated as a wall-system process, not just a decoration step. The product may be light, but the installation logic still matters.
A successful installation has four goals. First, the panels must stay securely attached. Second, the finished wall must look continuous and intentional. Third, the edges, corners, and joints must not reveal a cheap or temporary effect. Fourth, the installation method must match the project environment, whether it is a TV wall, fireplace feature, retail background, hotel lobby, restaurant wall, porch accent, or showroom display.
The real advantage of lightweight wall cladding appears when the installer combines speed with control. PU panels can reduce labor complexity, but they cannot fix poor planning. A professional installation begins before the first panel touches the wall.
Start by defining the installation environment
Before asking how to install PU wall panels, buyers should ask where the panels are being installed.
An indoor living room TV wall is different from a restaurant background wall. A bedroom headboard wall is different from a hotel corridor. A fireplace feature wall is different from a plain decorative wall. A sheltered porch wall is different from a fully exposed exterior façade. Each environment changes the installation method.
For a dry indoor feature wall, the focus may be layout, seam control, visual alignment, adhesive bonding, and clean finishing. For a commercial wall, the focus may include impact resistance, fire documentation, cleaning needs, and repeatable installation quality. For an exterior wall, the focus becomes more demanding: drainage, UV exposure, temperature movement, fasteners, edge sealing, and substrate stability.
The installation environment also affects product selection. Some panels are designed mainly for interiors. Some are suitable for selected exterior applications. Some may have better density, coating, or fastening structure. Using an indoor decorative panel outdoors and then blaming the installation is a common mistake.
Match the installation method to the wall type
The wall surface can be drywall, plaster, cement board, concrete, brick, plywood, fiber cement board, existing tile, metal framing, or another substrate. Each wall type requires a different preparation and fixing method.
Drywall may be suitable for many decorative interior installations if it is clean, dry, flat, and structurally stable. Concrete or masonry may require different adhesive and anchors. Painted walls may need surface sanding or cleaning. Existing tile may require special bonding preparation. Exterior walls may need weather-resistant backing and mechanical fastening.
A good installation plan does not begin with the panel. It begins with the wall.
Wall surface preparation decides long-term success

Poor wall surface preparation is one of the main reasons panel projects fail. Many buyers focus on panel quality but ignore the wall behind it. A panel can only perform as well as the surface it is attached to.
The wall should be clean, dry, flat, and stable. Dust, oil, loose paint, old wallpaper, moisture, mold, flaking plaster, and uneven surfaces can reduce adhesion and create visible defects. If the wall is weak, the panel may bond to the paint layer rather than the wall structure. When the paint peels, the panel comes loose with it.
Moisture is especially important. PU panels should not be installed over damp walls, hidden leaks, or surfaces with condensation problems. If a basement wall or exterior wall has moisture issues, those issues must be solved before installation. Covering the wall with faux stone wall panels may hide the problem temporarily, but it can also trap moisture and create worse damage later.
Flatness matters too. A textured panel can hide small surface imperfections, but it cannot correct a wall that bows, waves, or has major bumps. Uneven walls create gaps behind panels, misaligned joints, and weak bonding points. If the wall is not flat enough, installers may need to skim, sand, patch, or add a suitable backing board.
What to check before installation begins
The installer should inspect the wall under good lighting. Look for cracks, peeling paint, uneven corners, moisture stains, loose substrate, soft areas, and old adhesive residue. Use a straightedge or level to check flatness. Confirm where studs, framing, pipes, wiring, and outlets are located. Check ceiling and floor lines, because many rooms are not perfectly square.
Good wall surface preparation is not glamorous, but it is the foundation of the entire project. If this step is rushed, every later step becomes harder.
Layout planning prevents obvious seams and awkward cuts
A common DIY mistake is starting from one side of the wall and installing panels one by one without planning. This can create narrow end cuts, repeated patterns, misaligned joints, and awkward corners. Professional PU stone panel installation requires dry layout before final fixing.
Dry layout means placing panels without adhesive to understand how the wall will be covered. This helps the installer decide where to start, how to stagger panels, where cuts will fall, and how seams will appear. It is especially important for stone-look panels because repeated texture can become obvious if panels are aligned too mechanically.
For a TV wall, the installer should plan around the screen centerline, cabinets, speakers, sockets, and lighting. For a fireplace wall, the layout should consider the firebox, mantel, clearance zones, and trim areas. For a commercial wall, layout should consider customer viewing angles, signage, counters, furniture, and lighting.
Start from the visual center, not always the left edge
Many installations should start from the most visible area rather than the physical edge. On a TV wall, the screen area may be the visual center. On a fireplace wall, the firebox opening may define the composition. On a retail wall, the display center may matter most. Starting from the wrong place can push ugly cuts into the most visible zone.
Stagger patterns to reduce repetition
Because PU wall panels are molded products, pattern repetition can happen. Staggering panel positions and rotating compatible panels when possible can reduce this effect. Installers should avoid obvious vertical seams, especially on large walls and well-lit surfaces.
The viewer should see a stone wall, not a grid of panels.
Choosing adhesive and fasteners is not a random decision
The phrase adhesive for wall panels sounds simple, but adhesive choice is one of the most important installation decisions. Not all construction adhesives work with all panels, substrates, temperatures, or environments.
A suitable adhesive should bond to the panel material and the wall surface. It should remain stable after curing. It should not dissolve or damage the panel. It should be appropriate for indoor or outdoor use depending on the project. It should tolerate expected temperature and humidity conditions.
For interior installations, adhesive may be enough in some applications when the wall surface is suitable and the manufacturer supports that method. However, many installers still use mechanical fasteners as additional security, especially on large panels, commercial walls, uneven surfaces, or areas where panels may be touched frequently.
For exterior applications, adhesive alone is often riskier unless the product system specifically supports it. Wind, temperature movement, moisture, and surface expansion can stress the bond. Mechanical fastening may be required.
When mechanical fasteners are useful
Fasteners can provide immediate holding strength while adhesive cures. They can also improve long-term stability on certain substrates. Screws, nails, staples, anchors, or clips may be used depending on the panel design and wall type.
The challenge is appearance. Visible fasteners can damage the stone effect if not hidden or finished correctly. Some systems allow fasteners through mortar-like grooves or overlapping edges. Others require color-matched touch-up. The supplier’s installation guide should explain this.
Do not overuse adhesive
More adhesive is not always better. Excess adhesive can squeeze out through joints, create uneven panel seating, slow curing, or make later adjustment difficult. Adhesive should be applied according to the panel size, wall type, and supplier guidance.
Professional installation is not about using the strongest glue available. It is about using the right bonding system for the right wall.
Cutting PU stone panels requires clean planning, not heavy equipment

One major advantage of PU panels is that cutting PU stone panels is usually easier than cutting natural stone, brick, or cement veneer. This makes the product more accessible for renovation projects and smaller contractors.
However, easy cutting does not mean careless cutting. Poor cuts around outlets, ceilings, corners, cabinets, windows, and baseboards are highly visible. A jagged edge can make the whole wall look unprofessional.
Before cutting, the installer should measure twice and test fit the panel. Mark cuts clearly on the back or less visible side when possible. Use tools recommended by the supplier. Depending on the panel density and thickness, common tools may include a fine-tooth saw, utility knife, jigsaw, circular saw, handsaw, or oscillating tool. The right tool depends on the product.
Cutting around outlets and switches
Outlets and switches are common problem areas in PU stone panel installation. The panel thickness may affect how outlet boxes and covers sit on the wall. Installers should ensure electrical components remain safe, accessible, and code-compliant. Outlet extenders may be needed in some cases. Electrical work should be handled by qualified professionals where required.
Cuts around outlets should be tight enough to look clean but not so tight that they force the panel or block access. Covers should sit flat after installation.
Cutting at ceilings and floors
Ceiling and floor lines are often not perfectly straight. If panels are cut without checking actual conditions, gaps may appear. In some projects, trim, baseboard, crown molding, or caulk may hide small variations. In others, the cut edge remains visible. The installer should decide the finishing strategy before cutting.
Corners and trims decide whether the wall looks complete
Flat wall panels are only part of the project. Corners, edges, and transitions decide whether the installation looks like a real wall system or a temporary surface cover.
Corner trim wall panels are especially important for stone-look products. A flat panel wrapping awkwardly around an outside corner can reveal the panel thickness and destroy the illusion of stone. Proper corner pieces, L-shaped corners, mitered cuts, edge trims, or designed returns help the wall look finished.
Inside corners also need planning. If two panel walls meet at an inside corner, the installer must decide which wall runs first, how the texture aligns, and how gaps are finished. Random overlapping can look messy.
Outside corners are the most visible test
Outside corners catch light and touch. In commercial spaces, they also receive impact from people, furniture, carts, and cleaning equipment. A weak outside corner will fail visually and physically. This is why a supplier with a good corner system has an advantage over a supplier that only sells flat panels.
Edges need a planned ending
Every wall has an end. The panel may stop at a doorway, cabinet, ceiling, baseboard, window, shelf, counter, or another material. If the ending is not planned, raw edges may show. Trim pieces, return panels, color-matched filler, or architectural transitions can solve this.
A professional wall is not judged only in the center. It is judged at the edges.
Seam control is the difference between paneling and cladding
Seams are unavoidable in most faux stone wall panels installations. The goal is not necessarily to make every seam invisible, but to make seams look natural and controlled.
Some PU panel systems use interlocking edges. Others use butt joints. Some require caulk, filler, touch-up paint, or overlapping installation. Whatever the system, seam treatment must be consistent.
If seams align vertically across multiple rows, the wall may look like a grid. If panel color varies sharply from one piece to another, seams become obvious. If the installer leaves gaps, shadows may reveal the panel boundaries. If too much caulk is used, the seam can look artificial.
Lighting reveals seam quality
A seam that looks acceptable under soft daylight may become obvious under side lighting or LED strips. This is especially important for TV walls, hotel lobbies, restaurants, bars, and retail stores where lighting is part of the design. Installers should inspect the wall under final or similar lighting conditions before considering the job finished.
Touch-up work should be part of the plan
Some installations require color touch-up after cutting or fastening. Touch-up paint or finishing material should match the panel color and texture. Using a random gray or brown paint can make the repair more visible than the cut.
For strong PU stone panel installation, touch-up is not an afterthought. It is part of the finishing system.
Installing around fireplaces requires extra discipline
Many buyers want to know how to install PU wall panels around a fireplace. This application is visually attractive, but it requires caution.
First, the fireplace type must be identified. Electric, gas, wood-burning, ethanol, decorative, indoor, and outdoor fireplaces all create different heat conditions. The installer must follow the fireplace manufacturer’s clearance instructions and local code requirements.
Second, the panel’s fire documentation and heat limits should be reviewed. A panel that is acceptable for general interior walls may not be suitable near heat. A fire-rated surface test does not automatically approve direct installation near a firebox.
Third, the substrate and adhesive must be suitable. Near heat, random adhesive can soften, fail, or release odor. A non-combustible backer may be needed depending on the application. Mechanical fastening may be recommended.
Fourth, vents must not be blocked. Electric and gas units often need airflow. Covering or restricting vents can create overheating risk.
For fireplace walls, installation should never be based only on appearance. A stone-look finish does not behave like stone unless the material and assembly support that use.
Interior commercial installation needs repeatability
Installing PU wall panels in a home is usually a single-wall project. Commercial installations are different. A restaurant, hotel, retail store, office, or showroom may require repeatability across many areas.
In commercial spaces, installers should create a method that can be repeated by different teams. This includes layout rules, starting points, fastening spacing, seam treatment, corner details, trim selection, cleaning instructions, and replacement method. If each installer handles the wall differently, the project may look inconsistent.
Commercial walls also face more contact. Chairs, carts, cleaning tools, luggage, customers, staff, and displays may touch the wall. Higher-density panels, stronger corners, and better edge protection may be needed. A wall that works behind a home TV may not be strong enough for a busy restaurant corridor.
Replacement planning matters
In commercial interiors, panels may need to be replaced after damage or renovation. Installers should consider whether individual panels can be removed without destroying the entire wall. This is one of the practical advantages of panel systems when planned correctly.
For hotels, restaurants, and retail stores, installation is not only about the first day. It is about maintenance over time.
Exterior installation requires a different standard
Exterior lightweight wall cladding must be installed with more caution than interior panels. Outdoor conditions introduce rain, sunlight, wind, temperature movement, dirt, and possible freeze-thaw cycles.
The wall behind the panel should be exterior-appropriate and structurally stable. Water movement should be considered. Joints and edges must not trap water. Fasteners should be corrosion-resistant and suitable for the substrate. Expansion and contraction should be allowed for if required by the product system. Bottom edges should avoid standing water or direct ground contact unless the system is designed for it.
Exterior adhesive for wall panels must be suitable for outdoor use, temperature changes, and moisture exposure. In many exterior applications, mechanical fastening should be part of the system.
The installer should also consider wall orientation. A shaded porch wall is different from a west-facing façade exposed to intense sun. A covered patio is different from a coastal wall hit by wind-driven rain. The installation method should match the exposure level.
Exterior use is not simply interior installation moved outside. It is a different wall condition.
Common installation mistakes that damage the final result

Most installation mistakes are preventable. They usually happen because the installer treats PU panels as simple decoration rather than a wall system.
The first mistake is installing over a dirty or unstable wall. Dust, loose paint, old wallpaper, and damp surfaces can ruin adhesion.
The second mistake is skipping dry layout. Without planning, seams, cuts, and repeated patterns become obvious.
The third mistake is using the wrong adhesive. Some adhesives do not bond well, some are not suitable for the substrate, and some may damage the panel.
The fourth mistake is ignoring fasteners where they are needed. Large walls, exterior areas, commercial spaces, and uneven substrates may need mechanical support.
The fifth mistake is making rough cuts around outlets and edges. These small details are often where quality is judged.
The sixth mistake is leaving corners unfinished. Poor corners make even good panels look cheap.
The seventh mistake is overusing panels in a room. Covering every wall with strong texture can make the space feel heavy or artificial. Installation planning should also include design restraint.
The eighth mistake is ignoring lighting. Side lighting can reveal seams, repeated patterns, and uneven surfaces.
The ninth mistake is treating fireplace areas casually. Heat and clearance issues must be reviewed before installation.
The tenth mistake is failing to give the customer maintenance guidance. A finished wall still needs cleaning and inspection instructions.
Avoiding these installation mistakes is often more important than choosing the most expensive panel.
Quality control after installation
A professional installer should inspect the wall before handing over the project.
Check panel adhesion. Press gently in several areas to see if any panel feels loose or hollow. Check seams under different lighting. Check corners and edges. Check around outlets, switches, shelves, cabinets, fireplaces, windows, and baseboards. Check whether any adhesive residue is visible. Check whether touch-up areas match the surface.
The wall should also be cleaned properly. Dust from cutting or installation should be removed according to the supplier’s cleaning instructions. Harsh chemicals should be avoided unless approved.
For commercial installations, the installer should document panel model, batch number, color, installation method, adhesive type, fastener type, and replacement instructions. This information helps future maintenance.
For distributors and suppliers, this kind of installation documentation can reduce after-sales disputes. If a problem appears later, it is easier to identify whether it came from product quality, wall condition, adhesive choice, or installation error.
Maintenance begins with correct installation
Maintenance is often discussed after installation, but it begins during installation. A wall with poor seams, exposed raw edges, weak corners, or trapped moisture will be harder to maintain from day one.
For interior walls, maintenance usually involves dusting, gentle wiping, and avoiding impact or harsh cleaning chemicals. In restaurants or commercial areas, cleaning behavior may need stricter guidance. Grease, hand contact, furniture impact, and cleaning tools can affect the wall.
For exterior walls, maintenance may include checking joints, cleaning dirt, inspecting fasteners, removing plant contact, and watching for water accumulation. The supplier should provide instructions based on the product coating and use environment.
A good PU stone panel installation should leave the customer with realistic expectations. PU panels are easier than stone in many ways, but they are still finished surfaces that need correct use.
What suppliers should provide to support installation
A supplier that wants to compete internationally should not sell only panels. It should support installation.
At minimum, the supplier should provide a clear installation guide, recommended tools, adhesive guidance, fastener instructions, substrate requirements, corner and trim options, cutting guidance, seam treatment instructions, maintenance guide, and warnings for unsuitable applications.
For B2B buyers, videos are valuable. A short installation video can reduce confusion and help distributors train contractors. Close-up images of corners, edges, outlets, and seams are also important because these are the areas customers worry about most.
Sample kits should include not only panel pieces but also trim or corner examples when possible. A distributor can explain the product better when the customer can see how the wall ends.
In the global market, installation support is part of product value. A factory that provides strong installation content can reduce after-sales risk and help buyers sell with confidence.
Why installation content improves sourcing trust
For buyers, installation content is a trust signal. If a supplier only shows beautiful finished walls but never explains wall preparation, adhesive, cutting, corners, or errors, the buyer may suspect the product is not ready for serious use.
Detailed installation content shows that the supplier understands real projects. It helps homeowners decide whether they can install the product themselves. It helps contractors estimate labor. It helps importers prepare manuals. It helps distributors reduce complaints. It helps designers specify the product more confidently.
This is especially important for building material sourcing because construction products create downstream responsibility. The buyer is not simply purchasing a decorative item. They are purchasing a material that must be installed correctly by someone else.
Strong installation guidance turns PU wall panels from a visual product into a practical wall solution.
Final perspective: easy installation still needs professional thinking

The biggest advantage of PU stone-look panels is not that they remove all installation skill. The advantage is that they shift stone-look wall design into a more manageable construction process.
PU stone panel installation can be faster and more accessible than traditional stone veneer installation. Cutting PU stone panels is usually easier. Handling is lighter. Wall transformation can be quicker. The product can support homes, restaurants, hotels, offices, retail stores, and selected exterior accents.
But the wall still needs discipline. Good wall surface preparation prevents failure. Dry layout prevents awkward seams. Correct adhesive for wall panels improves bonding. Fasteners add security where needed. Corner trim wall panels and edge details make the wall look complete. Seam control protects realism. Fireplaces require safety review. Exterior walls require weather thinking. Commercial walls require repeatability.
A successful PU wall project is not defined by how fast the first panel is installed. It is defined by how well the finished wall looks and performs after installation.
That is the professional way to understand how to install PU wall panels. Lightweight materials make the job easier, but correct installation makes the wall credible.
Focused FAQ
What is PU stone panel installation?
PU stone panel installation is the process of preparing a wall, planning panel layout, cutting panels, applying adhesive or fasteners, treating seams, finishing corners, and checking the final wall. It should be handled as a wall-system process, not just a decorative attachment.
How to install PU wall panels correctly?
To understand how to install PU wall panels, start with wall inspection, clean and dry the surface, plan the layout, measure and cut carefully, use suitable adhesive or fasteners, stagger seams, finish corners and edges, and inspect the wall under final lighting.
Are PU wall panels easy to install?
PU wall panels are generally easier to install than natural stone or cement-based veneer because they are lightweight and easier to cut. However, they still require proper wall preparation, layout planning, seam control, and finishing work.
Are faux stone wall panels suitable for DIY installation?
Some faux stone wall panels are suitable for skilled DIY users, especially on simple interior feature walls. More complex projects involving fireplaces, exterior walls, large commercial areas, electrical outlets, or uneven substrates may require professional installation.
Why is wall surface preparation important?
Wall surface preparation is important because panels need a clean, dry, flat, and stable surface for proper bonding. Dust, moisture, loose paint, old wallpaper, uneven walls, and weak substrates can cause adhesion failure or poor visual results.
What adhesive for wall panels should buyers use?
The correct adhesive for wall panels depends on the panel material, substrate, indoor or outdoor use, temperature, and humidity conditions. Buyers should follow supplier recommendations and avoid random adhesives that may fail, stain, soften, or damage the panel.
Is cutting PU stone panels difficult?
Cutting PU stone panels is usually easier than cutting natural stone or cement veneer. However, clean measurement and tool selection are still important, especially around outlets, corners, ceilings, cabinets, and baseboards.
Why are corner trim wall panels important?
Corner trim wall panels help finish outside corners, inside corners, edges, columns, and wall transitions. Without proper corner and trim treatment, the finished wall may reveal raw panel edges and look less realistic.
What makes lightweight wall cladding useful in renovation?
Lightweight wall cladding is useful because it reduces handling difficulty, wall load, installation time, and logistics pressure. It is especially valuable for interior renovation, commercial refresh projects, feature walls, and selected decorative exterior accents.
What installation mistakes should buyers avoid?
Common installation mistakes include skipping wall preparation, failing to dry-layout panels, using the wrong adhesive, ignoring fasteners, making rough cuts, leaving corners unfinished, aligning repeated patterns, ignoring lighting, installing near heat without review, and using indoor methods outdoors.
#PUStonePanelInstallation #HowToInstallPUWallPanels #PUWallPanels #FauxStoneWallPanels #WallSurfacePreparation #AdhesiveForWallPanels #CuttingPUStonePanels #CornerTrimWallPanels #LightweightWallCladding #InstallationMistakes